


When you visit a website these days, it feels like more often than not one of the first things you’ll be greeted with is a live chat window to help answer any of the visitor’s questions.
If HubSpot Live Chat is something you are interested in having on your HubSpot hosted website, you’ve come to the right place.
HubSpot Live Chat Options
Create a chatflow with live chat to connect visitors directly with members of your team. The live chat will appear as a widget on your website pages that visitors can click to start a real-time conversation with someone on your team.
For example, you can create a live chat to connect a visitor on your pricing page to a member of your sales team.
Or you could connect a visitor on one of your knowledge base articles to a member of your support team.
Or, if you don’t have the human resources to manage a chat bot, you can create a chat flow that will send automated responses to your website visitors based on the questions they ask or their responses to the chat bots prompts.
Getting Started
Before you can implement live chat, you need to connect a chat channel to the conversations inbox. The chat channel is where you can customize your team’s availability and the appearance of the widget. In addition, if you’re adding the live chat to a website that is not hosted with HubSpot, you need to add the tracking code to your external pages before you create a live chat. The live chat will not appear if the tracking code is not installed.
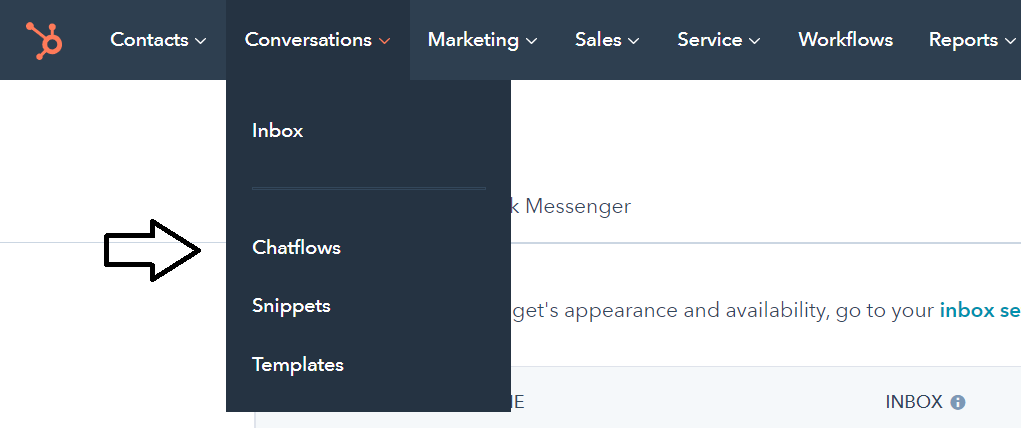
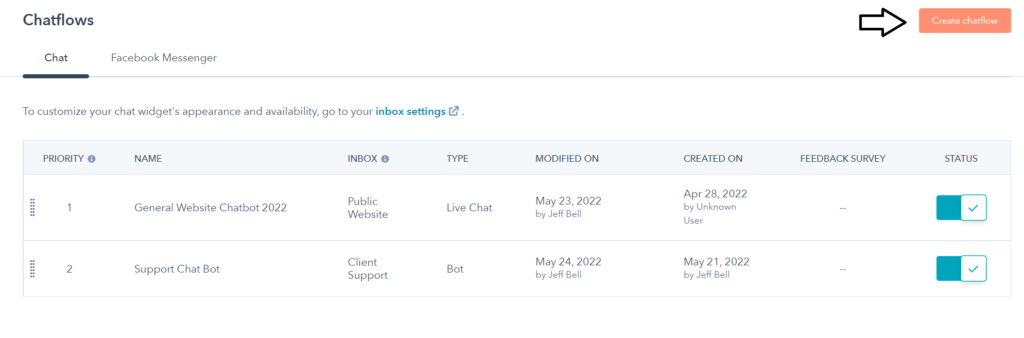
- In your HubSpot account, navigate to Conversations > Chatflows.
- In the upper right, click Create chatflow.
- Select Website.
- In the left sidebar, select a live chat option:
- If you want a visitor to be able to immediately start a chat with you and your team, select Live chat.
- If you’re a user in a Service Hub Professional or Enterprise account and have at least three published knowledge base articles, select Knowledge base search & live chat to add the option to search the knowledge base directly from your live chat widget.
- Click Next.
- If you have multiple inboxes set up in your account, click the “Select an inbox” dropdown and select a different inbox.
- To change the language of your chatflow from English, on the left, click the Select a language dropdown menu and select another language.
- Click Next.
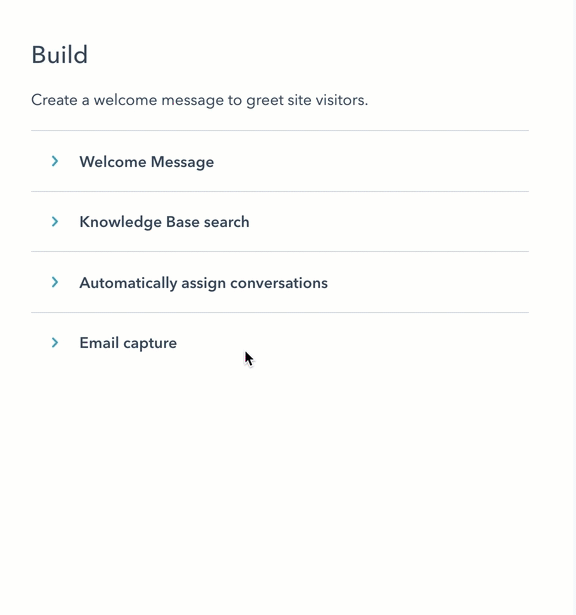
Build – create a welcome page
You’ll be redirected to the Build tab of the live chat setup. Customize the chat widget behavior and create a welcome message that will greet your visitors.
- To customize the message that appears when a visitor first starts a chat, click Welcome message to expand the section, then enter text in the Write a welcome message text box. Learn more about changing the welcome message language.
- To add the knowledge base search bar to your live chat, click Knowledge Base search to expand the section, then click to toggle the Enable Knowledge Base search switch on.
- To route incoming conversations to specific team members, click Automatically assign conversations to expand the section, then click to toggle the Automatically assign conversations switch on. Use the dropdown menus to select which users or teams to assign the conversations to.
- Note: only users with assigned Sales Hub or Service Hub paid seats can be included in your routing rules.
- To specify when visitors should be asked to provide their email address, click Email capture to expand the section. Click the Ask visitors for their email address dropdown menu and select an option, then enter the message to display when a visitor is asked for their email address.
- To continue, click Save at the bottom, then click the Target tab.
Target – decide where the live chat should appear
On the Target tab, you can decide where the live chat widget will appear on your website pages. You can display the live chat widget when a visitor is on a specific page URL, or based on known information about your visitors. You can also combine the targeting options to create a tailored, personalized experience for visitors to your site.
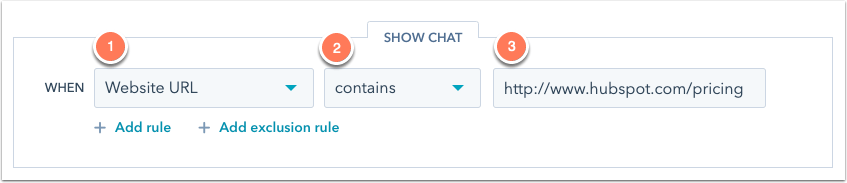
- To show the live chat widget when a visitor is on a specific website URL, in the Website URL section:
- Click the first dropdown menu and select Website URL.
- Click the second dropdown menu and select a targeting rule.
- Enter your rule criteria in the text field.
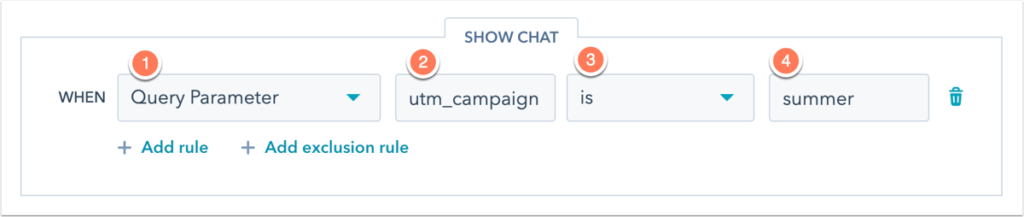
- To show the live chat widget when a visitor is on a website page whose URL includes specific query parameters:
- Click the first dropdown menu and select Query parameter.
- In the first text field, enter the query parameter name.
- In the second text field, enter the query parameter value.
- To add another rule, click Add rule.
- To exclude the live chat widget from certain pages (e.g., a privacy policy page), click Add exclusion rule.
You can also target your live chat to specific contacts based on known information about them. To set criteria based on visitor information, in the Visitor information and behavior section:
- Click the first dropdown menu and select a filter. You can use filters that specifically target known contacts or unknown visitors.
- Click the second dropdown menu and select your criteria.
- To add another rule, click Add rule.
- To exclude the pop-up form on certain pages (e.g., a privacy policy page), click Add exclusion rule.
- To create another filter group with additional targeting rules, click Add filter group.
- To continue, click Save at the bottom, then click the Display tab.
Display – customize the live chat’s appearance
On the Display tab, customize the live chat’s display settings, including the chat heading, the chat widget behavior, and the chat widget triggers.
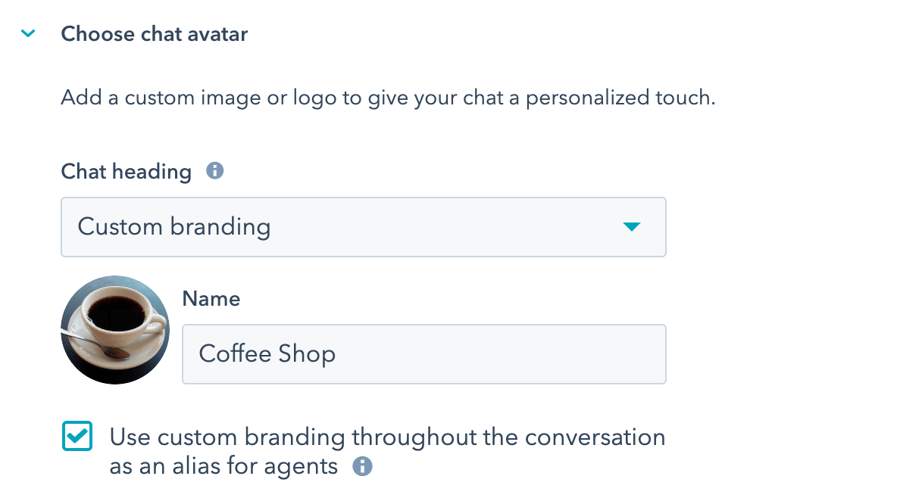
- Click to expand the Choose chat avatar section, then click the Chat heading dropdown menu and select the name and avatar to appear on the chat widget.
- Custom branding: display a generic team name and image.
- Click the plus icon (+) to upload an image or GIF, and enter the name to display.
- To apply the custom branding throughout the entire chat conversation instead of the user’s name and avatar, select the Use custom branding throughout the conversation as an alias for agents checkbox. Custom branding will also appear in the chat transcript.
- Note: if you select the Use custom branding through the conversation as an alias for agents checkbox, meeting links added to the chat widget via the meetings tool will be removed.
- Custom branding: display a generic team name and image.
- Specific users and teams: select the checkboxes next to the names to display. If you select more than three users, the three users will be displayed randomly.
- Contact owner: click the If there is no contact owner, assign to dropdown menu and select a fallback option for any new or unassigned visitors who start a chat.
- In the Chat display behavior section, control the widget’s behavior on desktop or mobile screens.
- Note: if a visitor chooses to minimize a chatflow, HubSpot will respect that visitor behavior across pages and chatflows until the hs-messages-hide-welcome-message cookie expires after 24 hours. This may conflict with your chat display behavior settings, so your chatflows might not pop open as expected.
- On the Desktop tab, select the radio button next to the preferred display behavior:
- Pop open the welcome message as a prompt: display a preview of the welcome message above the chat widget.
- Only show the chat launcher: only display the chat launcher so visitors have to click to open the chat window.
- Show the welcome message then pop open the chat when a trigger is met: display a preview of the welcome message and open the chat widget when a trigger is met or when the visitor clicks on the widget, whichever comes first.
- Based on which display behavior is selected, you can also decide when to load the chat widget on the page. Select the checkbox next to the chat display trigger. The selected trigger will apply on desktop, tablet, and mobile.
- On exit intent: trigger the live chat widget when a visitor’s mouse moves toward the top of the browser window.
- Time on page in seconds: trigger the live chat widget when a specified amount of time (in seconds) passes while the visitor is on the page
- Note: for a faster page load, HubSpot recommends a delay of 5 seconds or more
- Percentage of the page scrolled: trigger the live chat widget when the visitor has scrolled to a certain point on the page.
- On the Mobile tab, select the radio button next to the preferred display behavior:
- Pop open the welcome message as a prompt: display a preview of the welcome message above the chat widget.
- Only show the chat launcher: only display the chat launcher so visitors have to click to open the chat window.
- Note: to disable the chatflow on mobile devices, you can add an exclusion rule in your targeting settings to hide the chatflow when someone views your page on a mobile device.
- To continue, click Save at the bottom, then click the Options tab.
Options
- To enable the cookie consent text for the live chat widget, click to toggle the Consent to collect chat cookies switch on. You cannot customize the consent to cookies text that appears in the banner.
- When you enable the cookie consent text, you can then select when the consent banner should appear.
- To display the consent banner before a visitor starts a chat, select the Show consent banner before visitor starts a chat radio button.
- To display the banner when the visitor starts to leave the page, select the Show consent banner to visitor on exit intent radio button.

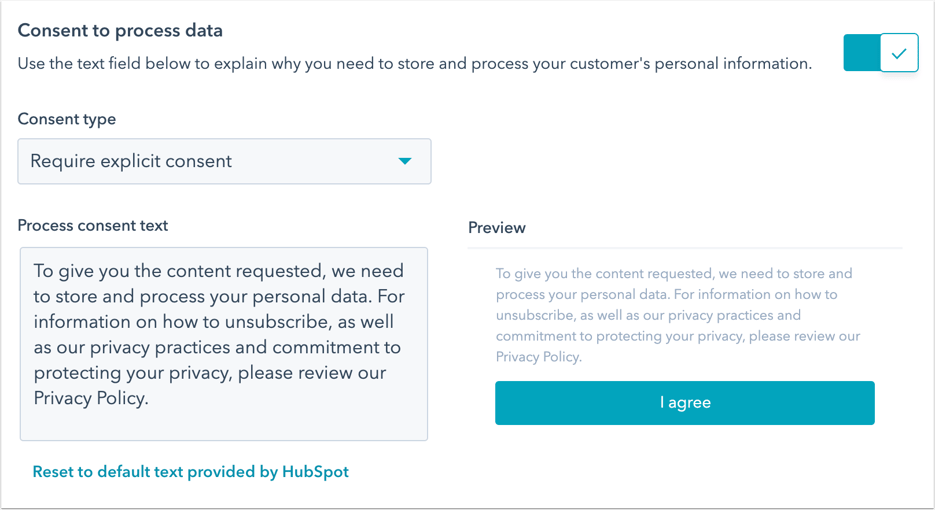
- To capture visitors’ consent to process their data, click to toggle the Consent to process data switch on.
- Click the Consent type dropdown menu and select one of the following:
- Require explicit consent: visitors need to click I agree before they can send a message.
- Legitimate interest: visitors’ consent is implied when they start to chat with you. The consent to process data text will still display, but they do not need to click I agree to start the chat.
- Click the Consent type dropdown menu and select one of the following:
- In the Process consent text field, HubSpot’s default text will appear. You can edit the text to explain why you need to store and process the visitor’s personal information. If you customize the consent text but then want to return to the default text, click Reset to default text provided by HubSpot.
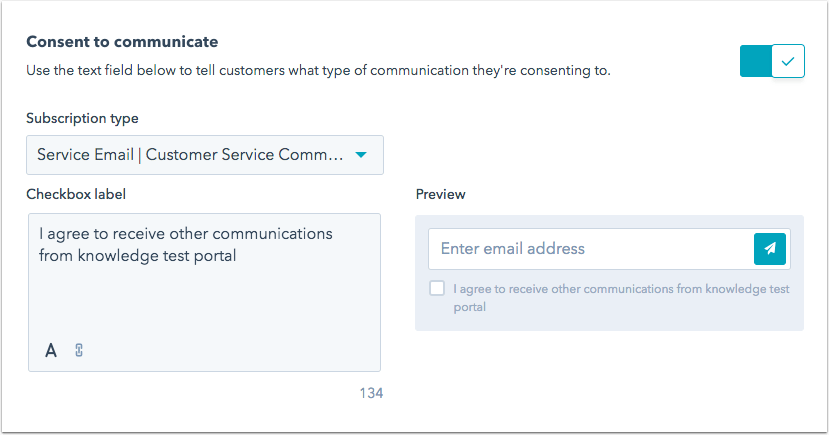
- To opt a visitor into a subscription type when they start to chat with you, click to toggle the Consent to communicate switch on.
- Click the Subscription type dropdown menu and select the subscription type you are opting your visitors into.
- Use the Checkbox label text field to inform customers what type of communication they’re consenting to.
- If you have access to marketing contacts in your account and you want contacts created from this chatflow to be set as marketing contacts, click to toggle the Marketing contacts switch on.
- You can send a customer satisfaction survey from within the chat widget. When a chat conversation ends, the survey will appear in the chat widget. As survey responses are collected, they will appear in the survey details page and in the thread in the conversations inbox.
- In the Collect feedback from chat visitors section, click the Connect existing survey dropdown menu and select a survey.
- Note: you can only connect an existing survey that has Chat selected as the delivery method.
- In the Collect feedback from chat visitors section, click the Connect existing survey dropdown menu and select a survey.
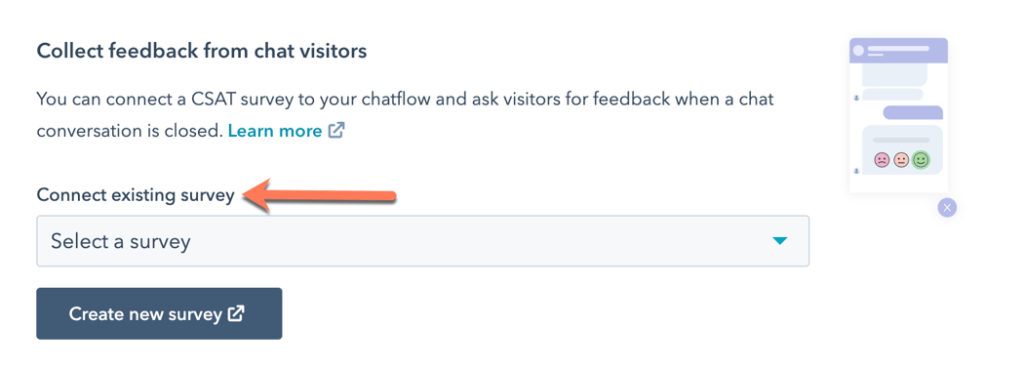
- To create a new survey to connect to the bot, click Create new survey and make sure to select Chat as the delivery method.
- Click Save
You can also connect a live chat to your Facebook Messenger account with a default instant reply chatflow
You can customize the Facebook Messenger chatflow’s instant reply message and routing rules:
- In your HubSpot account, navigate to Conversations > Chatflows.
- Click the Facebook Messenger tab.
- Hover over the chatflow and click Edit.
- On the Build tab, customize the chatflow’s instant reply message and routing rules.
- Click Save.
Work with MINDSCAPE to set up HubSpot live chat
If all this seemed like a lot to you, we’re happy to help you get set up with live chat here at MINDSCAPE. We are a HubSpot Platinum Partner and use HubSpot internally as well, so it is safe to say we know our way around.
