


Sequential advertising provides advertisers the ability to tell a story with their ads, which helps establish a deeper connection with their audience. Even test campaigns can increase your product or brand awareness pretty significantly.
It’s also a useful tool for lesser-known brands that need to build brand awareness before trying to sell their service, as well as companies that have services or products that need a deeper explanation.
Instead of information overload, you’re able to supply your audience with timed ads that pick up exactly where the others left off.
All too often, advertising is about sell, sell, sell and not enough about guiding your audience to the product on their own time. Pressure is high, and not many people respond to that well.
Sequencing is great for pairing blog posts and email campaigns with advertising, and providing your audience with messaging compatible with where they are in their buying journey.
Create your Facebook Sequence Ads in HubSpot
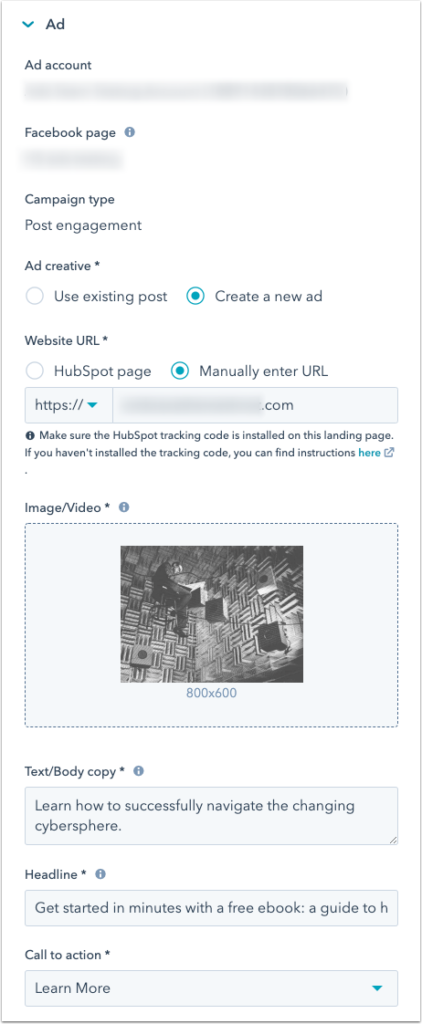
If you have an existing post from your Facebook page, select Use existing post, then select the post you want to use for your ad.
If you want to create a new post, select Create new post.
- Specify your website URL:
- If your website is hosted by HubSpot, select HubSpot page, then select a page.
- If your website is hosted externally, select Manually enter URL, then enter your website URL.
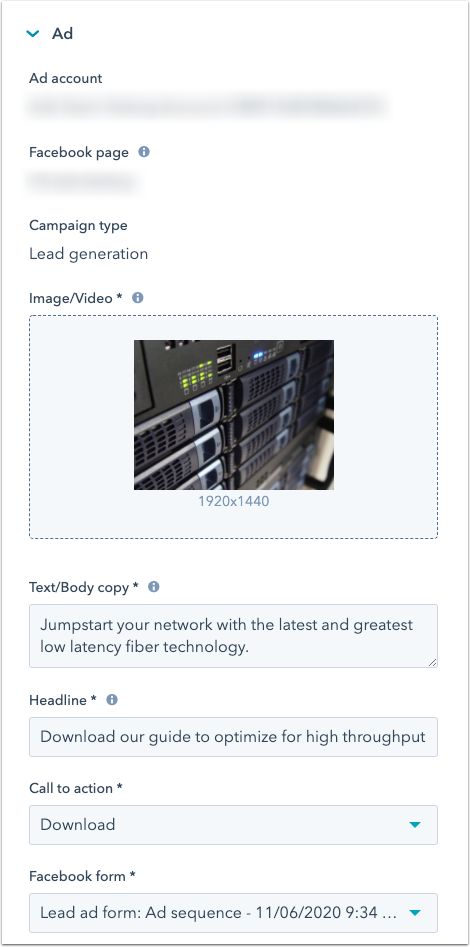
- Click Select Image/Video to upload an image or video.
- Enter your Text/Body copy that will be shown above the image or video of your ad.
- Enter your Headline that will be shown below the image or video of your ad.
- Select a Call to action for your ad.
After you’ve set up your first ad, you can set up your targeting:
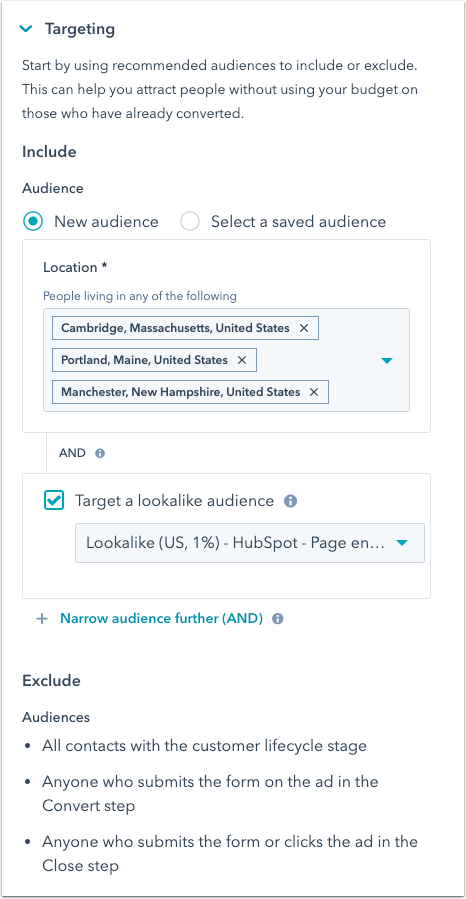
- If you want to use an existing saved audience, click Select a saved audience, then select an audience.
Note: You can only select saved audiences that target countries, regions, cities, designated market areas (DMAs), or country groups. If your saved audience targets other location types, such as zip codes, you cannot use it when creating your sequence.
- If you want to create a new audience, select New audience, then specify the criteria for the Facebook users you’d like to include in your targeting.
- Under Location, enter any specific city, state, or country.
- To broaden which users you’re targeting, you can add groups of filters.
- Under the bottommost AND filter, click Add filter (OR).
- Select Target a lookalike audience to include an audience, or click Add personal attribute filter (OR) to manually select the target interests, behaviors, or demographics for your ad.
- You can broaden your audience further by specifying another OR filter. You can restrict your audience by clicking Narrow audience further (AND), then selecting the criteria that must also match the existing criteria you’ve selected.
- If you want to exclude certain audiences from seeing your ad, click Add exclusion, then click Add audience exclusions. In the right panel, select any audiences you’d like to exclude.
- Since the goal of your first ad is to attract new customers, HubSpot will automatically exclude contacts in the customer lifecycle stage. Your first ad will also exclude Facebook users who converted on your second or third ads in the sequence, since these users have already expressed interest in your business.
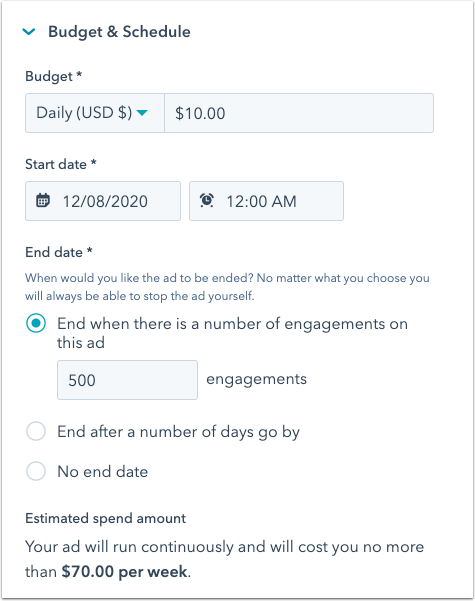
Once you’ve configured your first ad’s creative and targeting options, you can specify a budget and schedule:
- Click Budget & Schedule.
- Under Budget, click the dropdown menu and select whether your budget is for Daily or the Total amount for the ad, and enter the amount.
- Select a start date and start time.
- Select an end date option:
- End when there is a number of engagements on this ad: your ad will automatically complete as soon as it gets the specified number of engagements.
- End after a number of days go by: your ad will automatically complete as soon as the specified number of days go by.
- No end date: your ad will run indefinitely until you manually pause it.
Your second ad will target the same audience as your first ad, but you should aim to convert the visitors you initially attracted into contacts with a lead generation ad.
For the second ad, Facebook will prompt users when they click on the Call-to-action button on your ad to fill out a form and provide additional info. Under Facebook form, select a form to use:
- If you want to use an existing form from your Facebook page, click the dropdown menu and select a form.
- To create a new form:
- Click the Select a Facebook form dropdown menu.
- Click Create a new Facebook form.
- Enter your form name and select your form language.
- Configure your form:
- Choose and reorder the form fields you want users to submit. Click Add form field, then select a form field to include custom form fields, or click Create a new property to create and include a new custom property.
- Enter a link to your privacy policy.
- Select a notice and consent option to keep users informed of how you will use their data, and enter the corresponding text you want to prompt users with. If you want users to agree to multiple consent questions, you can click Add checkbox to add an additional prompt and checkbox.
- Under the Thank you section, you can configure the follow-up text that will appear after users submit your form.
- Click Create.
Enter a budget and schedule for your second ad
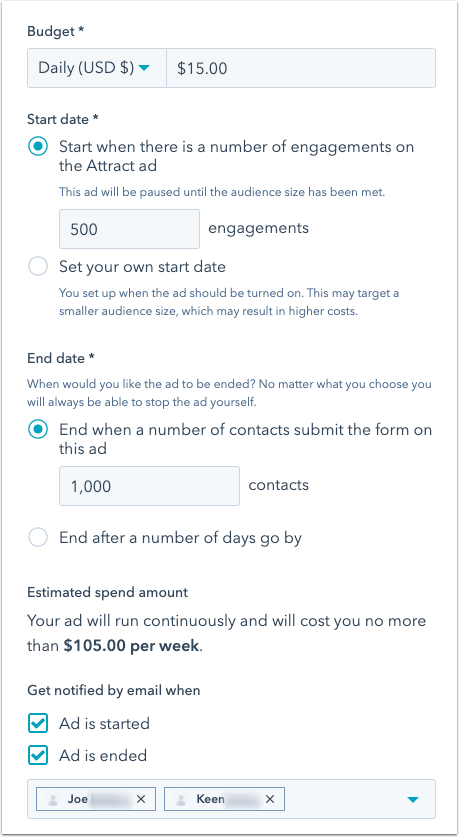
Once you’ve configured your second ad creative, you can specify a budget and schedule:
- Click Budget & Schedule.
- Under Budget, click the dropdown menu and select whether your budget is for Daily or the Total amount for the ad, and enter the amount.
- Select a start date option:
- Start when there is a number of engagements on the Attract ad: your ad will automatically start as soon as your first ad reaches the specified number of engagements.
- Set your own start date: manually enter a start time and start date.
- Select an end date option:
- End when there is a number of engagements on this ad: your ad will automatically complete as soon as it gets the specified number of engagements.
- End after a number of days go by: your ad will automatically complete as soon as the specified number of days go by.
- Configure email notifications:
- If you want to receive an email when your second ad starts, select Ad is started, and if you want to receive an email when the ad completes, select Ad is ended.
- Enter the HubSpot users that you want to be notified.
You can set up additional automation for your second ad. This step is optional.
- Click Automation, then click Create workflow.
- After HubSpot creates your new workflow, you can start adding actions to it by clicking the plus icon +.
Set up your third ad to close deals
Your third and final ad should entice the contacts from your second ad and encourage them to make a purchase.
Set up ad creative for your third ad
To create the final ad in your ad sequence:
- Select a campaign type for your third ad.
- If you’ve selected a web traffic campaign, set up your ad:
- Website URL: select whether to use a HubSpot or an external page with your ad.
- HubSpot page: select a HubSpot page.
- Manually enter URL: enter your external website URL.
- Website URL: select whether to use a HubSpot or an external page with your ad.
- Select Image/Video: upload an image or video for your ad.
- Text/Body copy: enter the text that will be shown above the image or video of your ad.
- Headline: enter the text that will be shown below the image or video of your ad.
- Call to action: select a call to action for your ad.
- If you selected a lead generation campaign:
- Under Facebook form, select a form.
- If you want to use an existing form from your Facebook page, click the dropdown menu and select a form.
- To create a new form, click the dropdown menu and click Create new Facebook form.
Enter a budget and schedule for your third ad
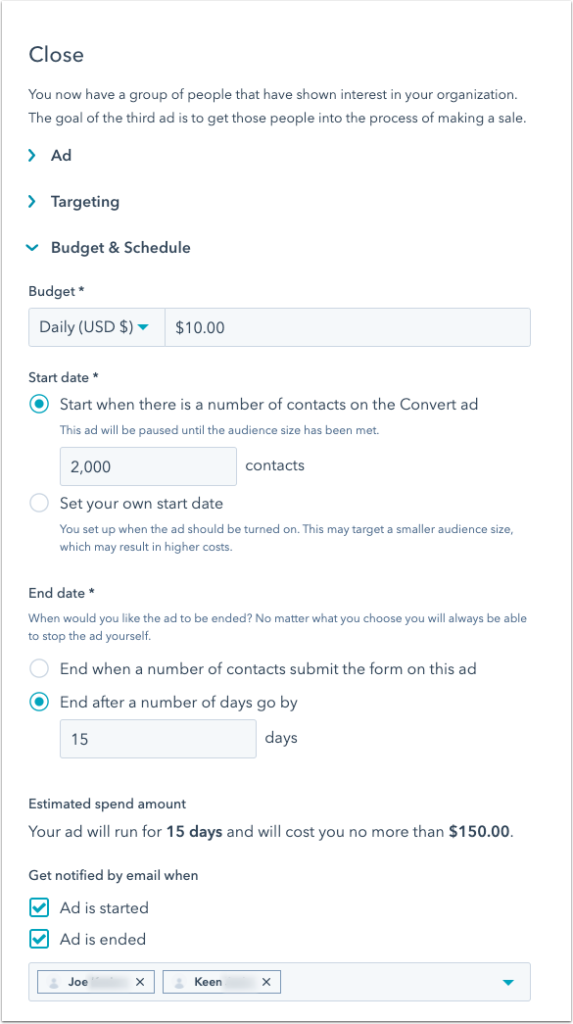
Once you’ve configured your third ad creative, you can specify a budget and schedule:
- Click Budget & Schedule.
- Under Budget, click the dropdown menu and select whether your budget is for Daily or the Total amount for the ad, and enter the amount.
- Select a start date option:
- Start when there is a number of contacts on the Convert ad: your ad will automatically start as soon as your second ad reaches the specified number of conversions.
- Set your own start date: manually enter a start time and start date.
- Select an end date option:
- End when a number of contacts click on this ad: your ad will automatically complete as soon as it gets the specified number of engagements.
- End after a number of days go by: your ad will automatically complete as soon as the specified number of days go by.
- Configure email notifications:
- If you want to receive an email when your third ad starts, select Ad is started, and if you want to receive an email when the ad completes, select Ad is ended.
- Enter the HubSpot users that you want to be notified.
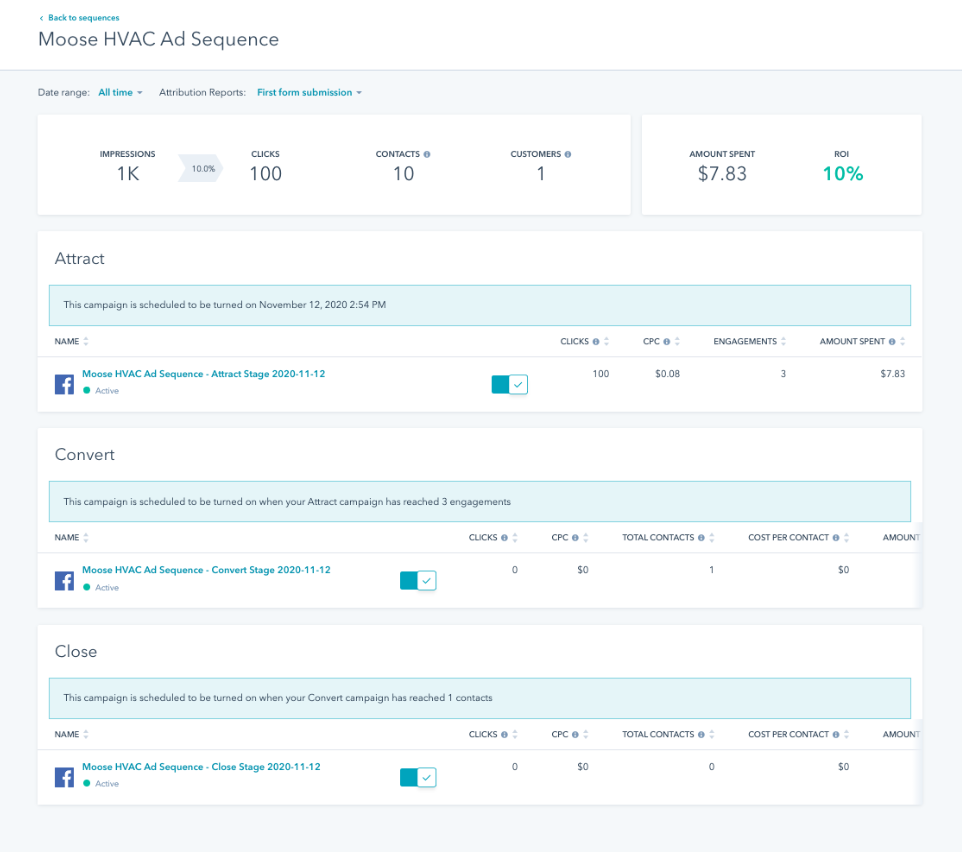
Once you’ve configured and reviewed the three ads in your sequence, click Publish in the upper right.
Manage your ad sequences
To manage your ad sequence after you’ve published it:
- In your HubSpot account, navigate to Marketing > Ads.
- In the left sidebar menu, click Sequences.
- Locate and click the sequence you created.
Facebook Sequence Ads with MINDSCAPE
If setting up Facebook Sequence Ads in your HubSpot account is something you’d be interested in working with MINDSCAPE to do — we’d be happy to help. We are a HubSpot Platinum Partner and use HubSpot ourselves. You can learn more about our services by clicking below.
