


Awhile back, we wrotea blog post covering all of the prep work that needs to be done to shoot the perfect video testimonial…but we never actually covered the shooting part. I talked to our in house photographer/videographer, Rachel Cohen, for a little advice on getting the job done.
The equipment you’ll need
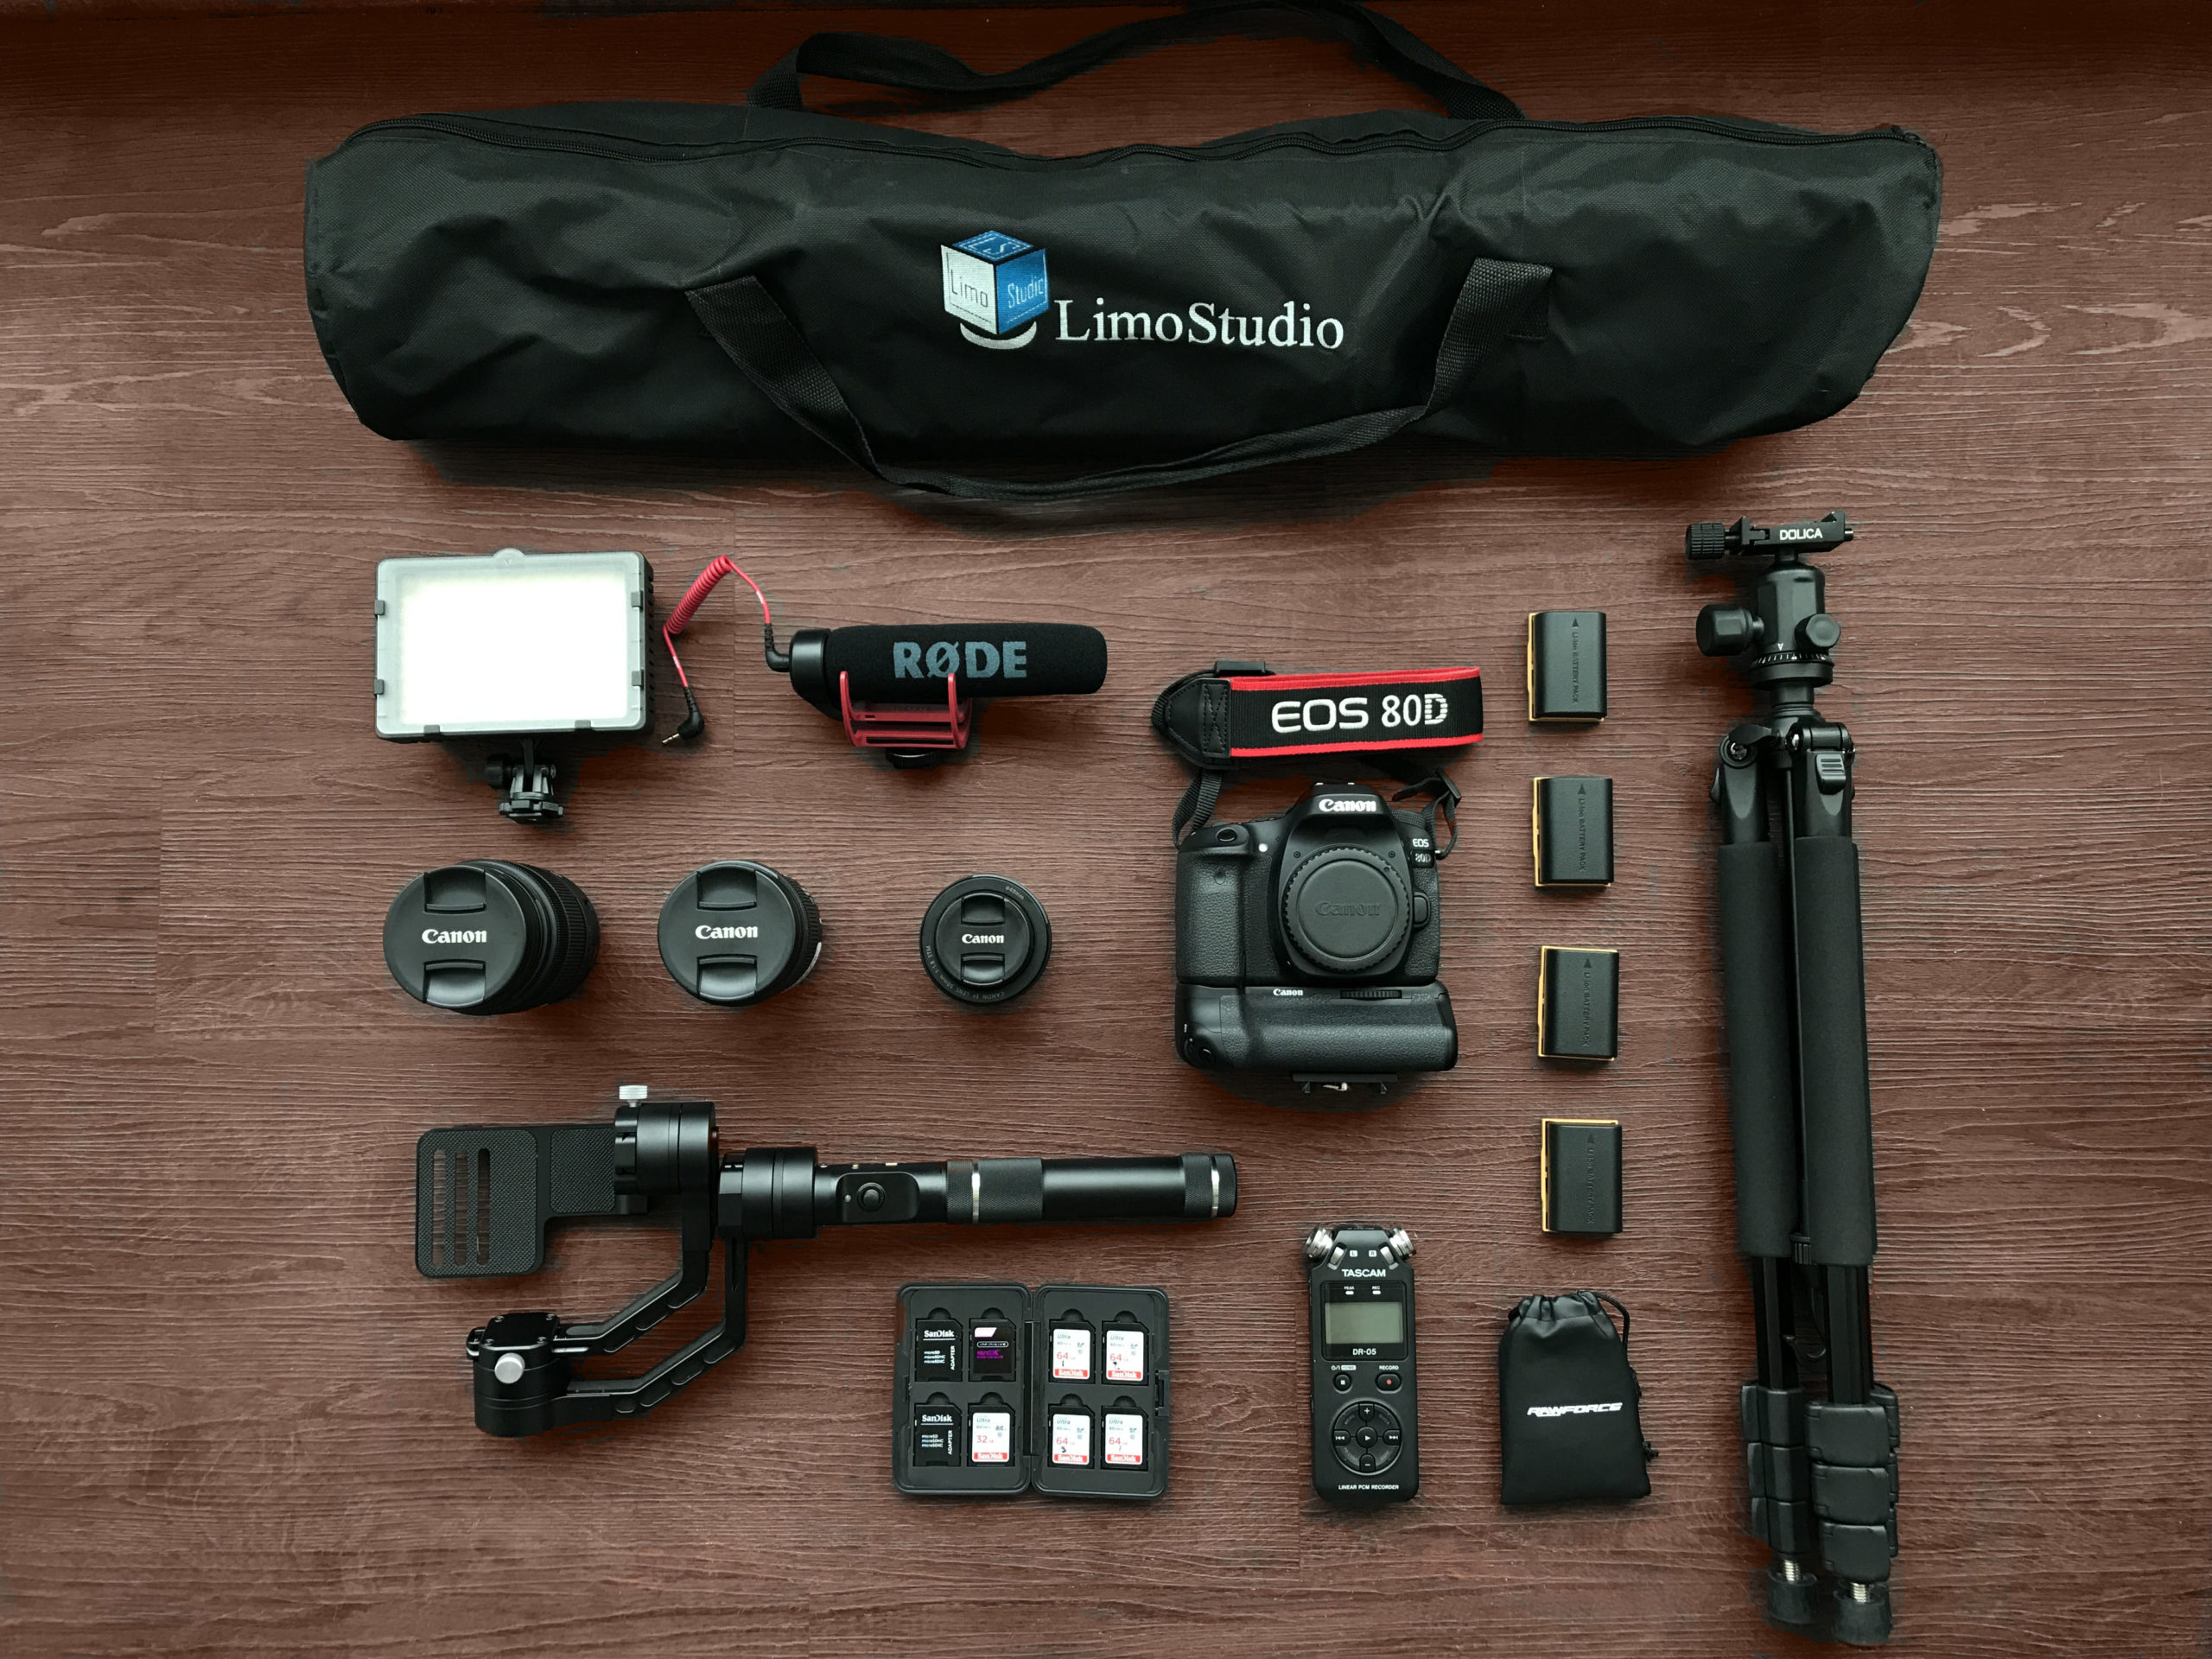
You don’t necessarily need high-brow equipment to shoot a video testimonial, but we strongly recommend investing in it anyway. Sure, you can always stream a live video via Facebook live, but if you are serious about video (which you should be) you won’t stop with testimonials. The equipment is well worth the investment. Here is what we use:
Camera: Canon EOS 80D. If you are shooting a formal interview that will end up on your website or will be used for other promotional purposes, you should be using a professional-grade camera. Lay down the $1,000 for a camera that will allow you to do it all.
Mic: Tascom DR-05 External Recorder, Rode VMGO Shotgun Microphone, and Lapel Microphone . We have found that using a lapel microphone along with an external recorder and an on-camera shotgun mic works well for shooting interviews. The lapel mic limits unwanted noise while clearly recording the interviewees’ voice. The shotgun mic and the external mic provide two other recordings to draw from in the event that something goes wrong with the lapel mic (for example: the interviewee bumps the mic).
Tripod: Standard Tripod: A tripod is essential for keeping your camera steady while taking stationary shots. Never leave for a shoot without one.
Stabalizer: Zhiyun-Tech Crane. To keep moving shots steady you will want some kind of camera stabilizer. Whether you choose to use a gimbal or a steadicam will depend on how often you plan on grabbing moving shots and how much control you wish to have over the camera’s movement. Regardless, be sure to pick one up.
Lenses: We use three different camera lenses for three different reasons
- A 10-18mm which is great for wide angle shots. This lens allows you to capture more of a small room when conducting interviews
- A 50mm which allows for more depth of field to blur out the background, making the shot more appealing
- A 18-135mm, which is a good lens for B-Roll. This lens has a large zoom which allows us to capture great candid shots, being that we don’t have to be up close to get them
Lighting: Neewer CN-160 LED Video Light and a 600W Day Light Umbrella Continuous Lighting Kit by LimoStudio. That Neewer light is convenient to have on hand for smaller needs, we use the 600W Day Light Umbrella Continuous Lighting Kit by LimoStudio for most setups if lighting is necessary, as it can be used to set up a 3 point lighting setup.
Other Equipment you might need: Extension chords, moving blankets, battery packs, a slider, etc.

Direction
Some of the people you interview will be natural on camera. They will know exactly what to say and exactly how to say it. Unfortunately, this is not a skill everyone possesses. When you are faced with an interviewee who has no experience in front of a camera, you may have to do some directing. This will mainly mean doing two things:
- Gently guiding your interviewee into standing the right way, sitting the right way, talking the right way, etc.
- Asking additional and sometimes leading questions when the responses you receive aren’t exactly hitting the mark.
Because of theses two things, we have found it profitable to have an interviewer and a cinematographer present while obtaining video testimonials. While the videographer focuses on the shot, the interviewer can direct the interviewee, making the process more efficient and less tedious for everyone involved.
Videography
We can’t teach you how to be an excellent videographer in a thousand word blog post; for that you will need years of training. We can, however, provide you with a few simple tips that will help you along the way.
Check your equipment: Be sure to perform any necessary checks on your equipment before shooting begins. The most common problems usually occur with sound and lighting. Make sure you are recording sound properly and make sure your lighting isn’t going annoy viewers (at the most basic level make sure your lighting is not too bright or too dim). Double check memory cards, batteries, and camera settings.
Be sure to get B-Roll: No one wants to watch five minutes of a single person talking in front of a camera. It’s boring, it’s uninspiring, and it will probably lead to viewers abandoning your video within the first 20 seconds. You can remedy this by shooting quality B-roll. B-roll in an interview would be any shot that isn’t of the interview itself. This might include shots of a product being used or a service being utilized, shots of the building or facilities you are shooting in, or shots of your interviewee interacting with different people. The video below provides a more in-depth look at the use of B-roll.
Use two cameras: If you have access to two cameras, we strongly suggest using both while filming. Having an additional camera will allow you to film two different shots at once. If something goes wrong with one camera you will have back up footage and shooting from two angles allows for shot variety and smooth transitioning.
What’s Next for Your Video Testimonial?
Sharing it with the world! Keep an eye out for part 3 of our series “Creating the Perfect Video Testimonial: Sharing Your Video”. We’ll share tips for sharing your video on social media and on your website, so you can get the most ROI for your video project.
If you’ve enjoyed this blog post and would like to receive more information on content creation everything digital marketing from MINDSCAPE, click below and subscribe to our blog! You’ll receive an email each time we publish a blog post, like part 3 of this series!
