


HubSpot CRM cards are a HubSpot record that displays data from an external app or service tied to that record.
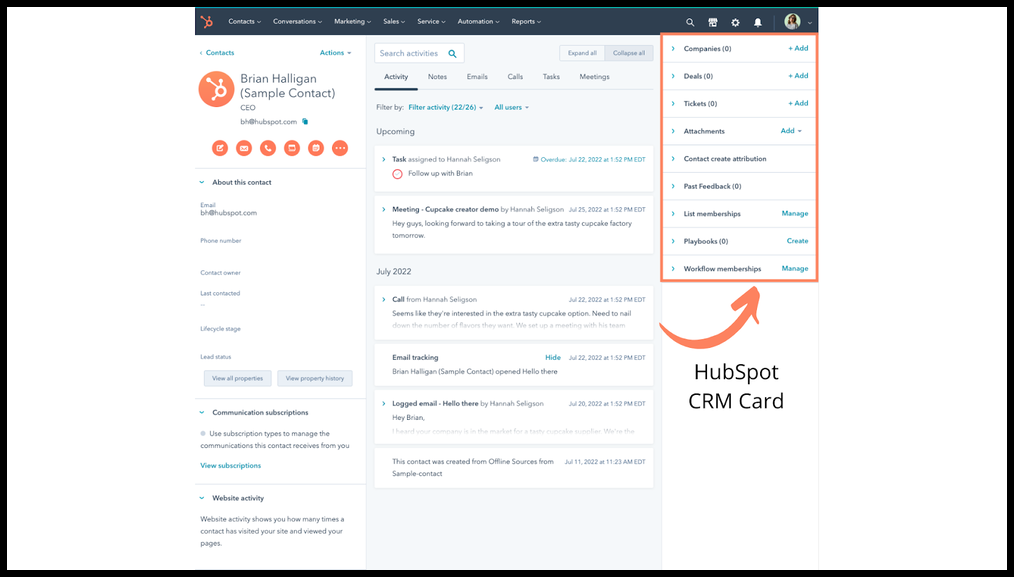
Custom CRM cards allow information from other systems to appear on HubSpot contacts, companies, deals, or ticket records. Using this feature, apps can create custom cards to display this data. If you would like to have your data live directly inside HubSpot but none of the native objects fit your needs, you might want to see if custom objects work for you.
Why CRM Cards are Helpful
When your organization or business has multiple teams using different apps, it can create chaos from a data perspective.
If teams are using multiple apps or services, including the HubSpot CRM for different business functions, reps are forced to bounce from app to app to collect data. This can lead to missed or duplicated information.
CRM cards provide a solution that allows your external apps or services to display data within HubSpot. That data can be viewed in the sidebar within a HubSpot contact, company, deal, or ticket record.
Let’s explore a couple of different use cases for a custom card.

CRM Card Use Case #1
Your business uses an external service for documents that allows you to build proposals and contracts and send them to customers whenever your rep makes a deal. These documents are related to both a deal and a company within your HubSpot CRM.
Instead of the rep having to check the external service for a document’s status and update their records in the CRM, a custom card can display the status of the document directly on the company record in a single location.
CRM Card Use Case #2
Your business provides customers with a product. You have a support team that manages bugs or issues for the customers, but it’s the engineering team that resolves the issues — and they use an external service, such as Jira or GitHub to track their development progress. Your support team, however, doesn’t have access to the Jira board or whatever tool your engineers use to track their work.
A solution that allows your engineers to share their progress with your support team using HubSpot is to include a CRM card applicable to that contact or company record and add an iFrame action that opens a window to the specific Jira task. This way the support team can see what they need to know about the bug and its progress in one place on HubSpot without needing to look at another app or service.
How do HubSpot CRM Cards work?
A custom card is a blank slate, so there’s a lot of room to play around with HubSpot CRM Cards.
There are two different approaches to setting up your data to display on the CRM card in HubSpot.
- Configuring CRM Cards within the App Settings
- Configuring CRM Cards through the HubSpot API endpoints
You can use both of these approaches to set up, modify or delete the information displayed on the CRM card.
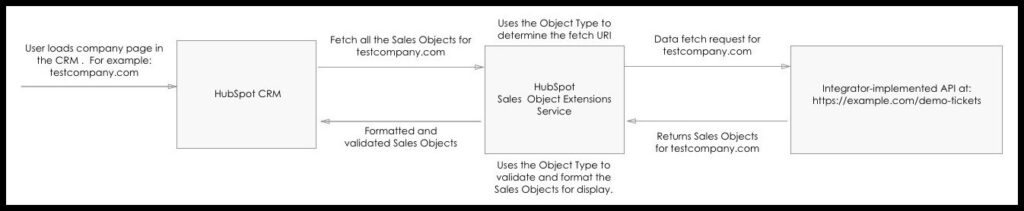
Essentially, the HubSpot API enables you to set up and manage the CRM card. Once the card is set up, each time the target record types are viewed in HubSpot, HubSpot makes a fetch request to your external service and uses the returned data to display the information on the CRM card. The diagram above exemplifies how data is shared between services and displayed on the CRM card whether you configure through the App Settings or the API.
For this post we will walk you through how to display your data on the CRM card following the App Setting approach step-by-step and highlight the fundamentals when adding a CRM card with the HubSpot API endpoints. To begin you will need to complete the prerequisites listed below to access the App Settings within the CRM.
If you are interested in the specifics of how data flows from the HubSpot CRM to the API and back, refer to the diagram below.
Configuring CRM Cards Within the App Settings
In order to configure your custom CRM card from an app, you need to complete the following steps first:
- Create a HubSpot developer account
- Create a public app
- Configure authorization
The developer account will allow you to build apps that enable you to package functionality to share with a HubSpot end-user. This is why we need to create an app to create the CRM card.
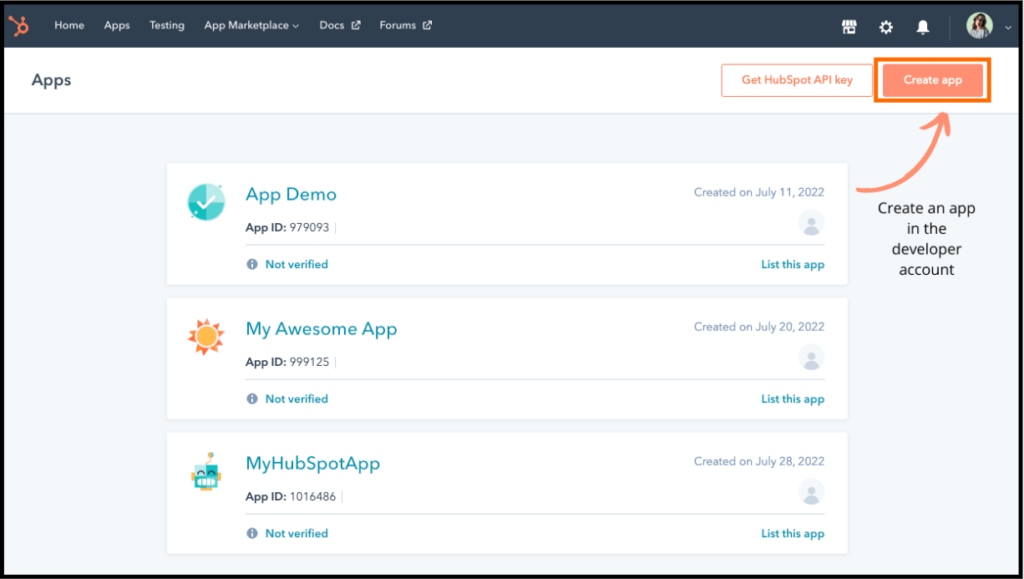
You can create an app by navigating to the “Apps” tab and clicking on the “Create app” button, shown above. Once you’ve created the app, you will need to fill out some information and settings.
Now we can begin creating the CRM card!
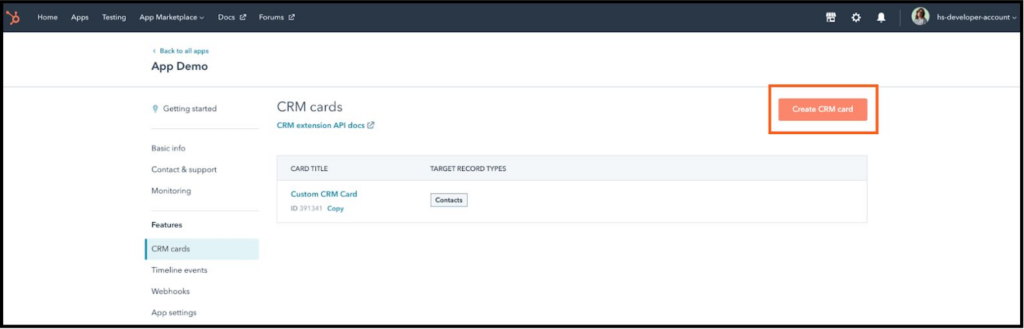
Create CRM Card
To create a CRM card, click on the “CRM cards” button on the left-hand navigation tied to the app you created. Then, click on the “Create CRM card” button (see the screenshot below).
CRM Data Request
When the card is created, you’ll begin by clicking on the “Data request” tab in the UI to add the data fetch URL, which will fetch and return data to display on the CRM card. This action is essentially a webhook. The URL is sent with a payload providing information for the associated CRM record of the card. That information can contain properties that are associated with the object type the CRM card is configured to.
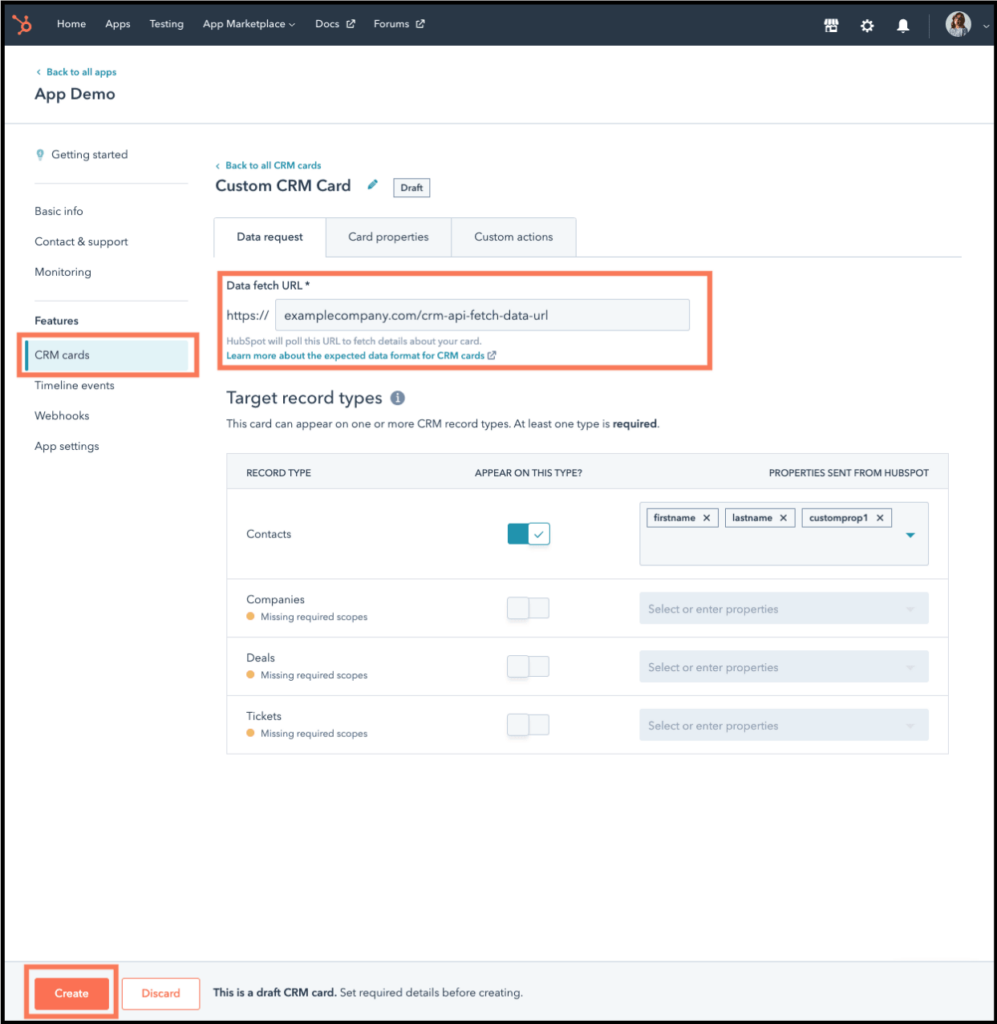
For example, your fetch URL might look something like this:
GET https://exampelcompany.com/contract?
userId=1782&userEmail=testcontact@examplecompany.com&associatedObjectId=2568&associatedObjectType=
COMPANY&portalId=1458965&domain=examplecompany.com
This request includes the associated ObjectType parameter that defines the type of object the user is requesting data about. In our example, we are fetching a request when the end user views a company record and displays the information on the card.
You can learn more about these parameters here by referring to the third tab under “Webhooks.”
Once you’ve established your fetch URL for the CRM card, you can then define your card properties.
CRM Card Properties
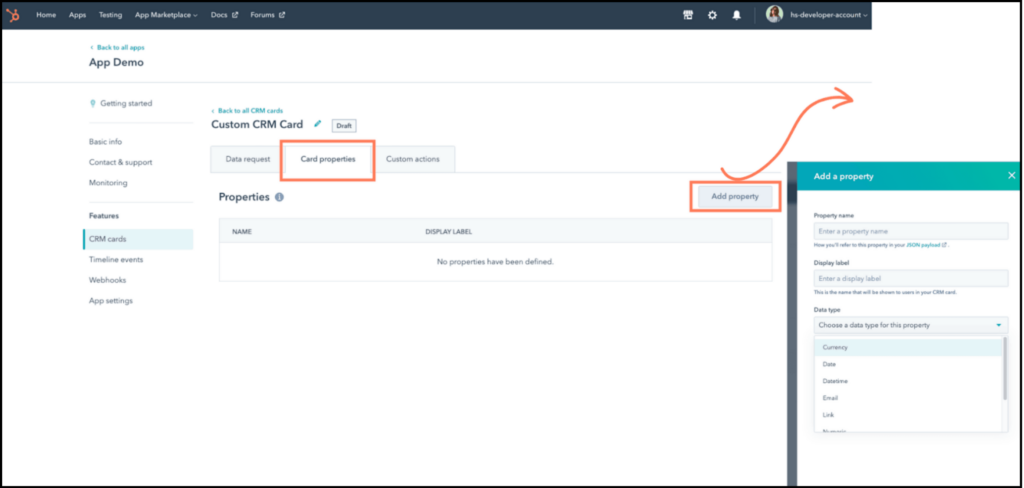
Within the CRM card are properties.You can add these properties by clicking on the “Card properties” tab and adding the ones you’d like displayed, including the following requirements:
- Property Name
- Display Label
- Data Type
Any properties added to a CRM card will appear as the primary content for the card.
CRM Card Custom Actions
In addition to the properties listed above, you can also add custom actions dynamically in the response to the fetch request. The setting shown below on the “Custom actions” tab within the UI is where you add the base URL.
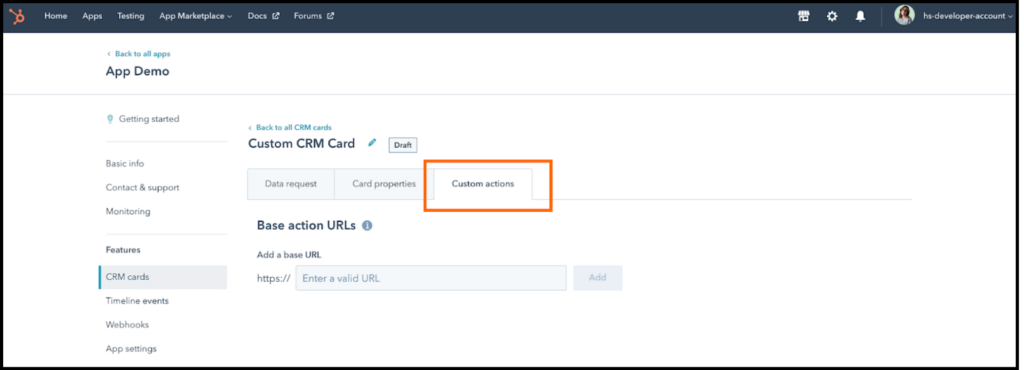
The base URL added to this tab must match the base URL that the action URL lists in that response. Below, we will identify what this would look like with the “uri” field within a specific action type. Keep in mind that you can set up multiple base URLs for actions as well in the card settings.
Let’s learn more about the different types of actions and how they can be defined. The three types of actions are:
- Action Hook
- iFrame Actions
- Confirmation Actions
Action Hooks with HubSpot CRM Cards
If you want to add an action to the CRM card that only allows a user to view a success or error message and that requires no confirmation or input, the Action Hook is your best choice.
When a user clicks on the link or button for an action hook, HubSpot sends a server-side request to your app, based on the definition within the JSON response:
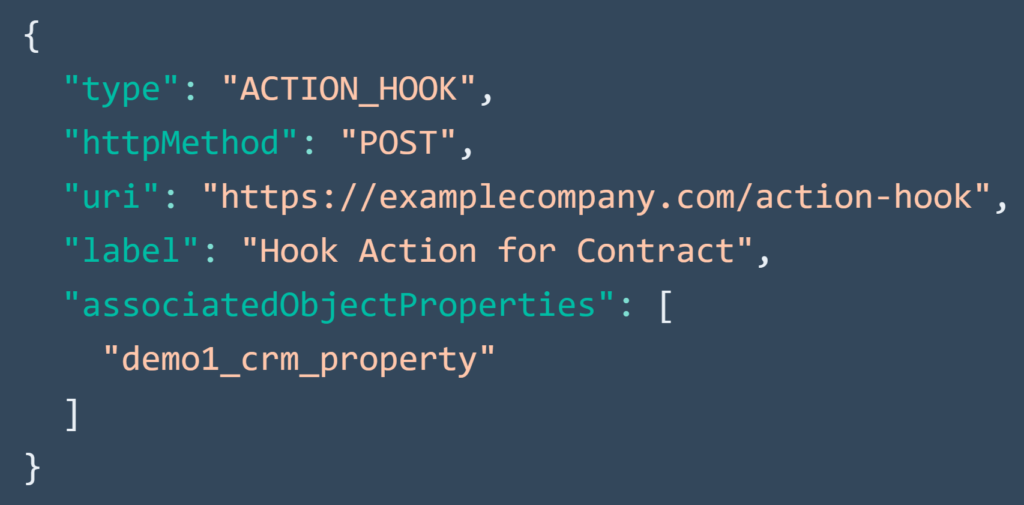
iFrame Action with HubSpot CRM Cards
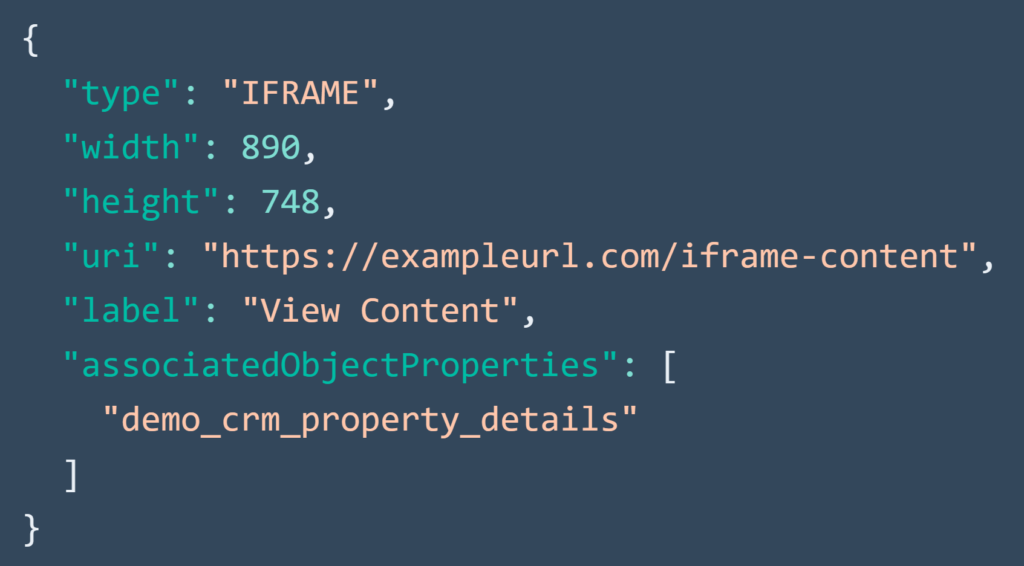
These actions are what you might assume — they open a modal within HubSpot with an iFrame that points to a URL.
Perhaps you have a web app that’s designed to be displayed within an iFrame in HubSpot. This action would support that functionality, allowing you to display the app for that record.
Here’s an example of the iFrame action definition:
Confirmation Actions with HubSpot CRM Cards
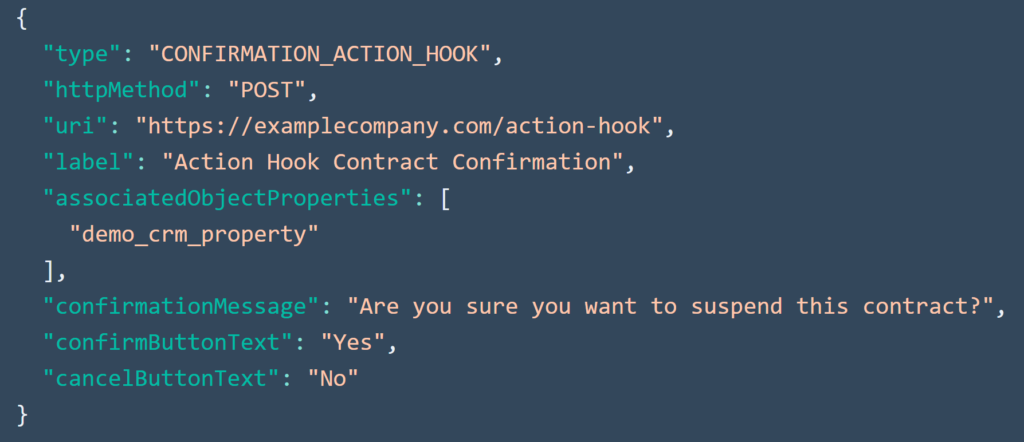
Confirmation actions behave similarly to action hooks. The only difference is that the former returns a confirmation dialog to the user before running the server-side request.
See the example definition below for the JSON response:
Configuring CRM Cards Through the API
You can also do everything we discussed above via the HubSpot API.
This approach is an API version of the same configuration we walked through already when setting up the CRM cards in HubSpot from the public app settings.
You can use the API to GET/CREATE/DELETE/UPDATE a CRM card. When creating a CRM card, you will send a POST request. Your path might look something like this in Postman:

Here’s an example of the JSON schema to create a CRM card:
In the example above, we are sending a request to create a new CRM card for contact records. However, it’s important to note that in this example, we’re passing an appId. You need to create the app first in your HubSpot developer account before you’re able to create a CRM card.
Get Started with HubSpot CRM Cards at MINDSCAPE
Setting this all up may seem like a lot, but if you’re interested in all the possibilities that come with HubSpot CRM cards then we’re happy to help you out here at MINDSCAPE. We’re in HubSpot every single day helping clients with problems just like this.
